|
 |
This install takes 1 to 2 hours and requires a little bit of patience and may cause skinned knuckles and over abundant use of profanity. Generally, if you can change your oil you can probably do this - just take your time. Also, having a second person is a major help.
Click on the images for larger views. |
WARNING:
- NEVER get under a vehicle supported solely by a jack! If you use a jack to raise the car, make sure to use jack stands to support it.
- You will be working around the vehicle's exhaust. Once you have the car on ramps or jack stands let it sit and cool off before starting work.
|
NOTE: The images below were taken after the original install and show the UUC shifter already in place. Your stock shifter will look slightly different (mainly in color). A few of the images are taken directly from UUC's instructions. |
Step 1: Getting the required items together
This install requires:
- 1 UUC SSK w/Bearing Upgrade
- Ramps or Jack and Jack Stands or Lift
- Long Flat Screwdriver
- Phillips Screwdriver
- Long Nose Pliers
- Snap Ring Pliers (if available)
- Ratchet Wrench and Socket Set
- Hammer
- 24mm Wrench (if you plan on adjusting shifter height)
- Flashlight
- Windex
- Helper (does not even have to know how to tie shoelaces)
- A BMW M3 (E46).
- 1 to 2 hours of free time.
|
 |
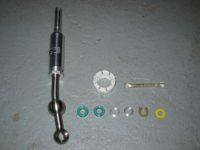
UUC SSK Kit w/Bearing Upgrade |
Step 2: Remove shift boot
- Carefully pull up the driver's side forward corner of the shift boot (see image).
- Once you have the corner released, work the rest of the way around the boot to release it completely
- Pull the shift boot up over the knob.
|
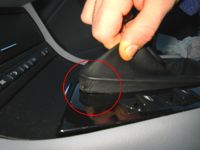
Removing the Shift Boot |
Step 3: Disconnect Power Lead and Remove Stock Knob
- Follow the wire that runs down from the stock knob to a connector.
- Disconnect the knob power wire from the car.
- Push the boot down to expose the knob.
- Using both hands, pull up on the knob to remove it - note: the knob is pretty tight, make sure not to smack yourself in the head with it once it releases from the shifter!
|
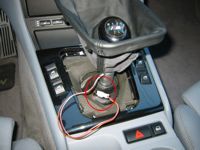
Location of the Power Wire |
Step 4: Removing the Center Trim and Insulation
- Remove the 2 screws at the back of the center panel.
- Disconnect the power window switch wiring (both sides).
- Remove the foam insulation piece (note its position)
|
Center Trim Bolt Locations
Window Switch Wiring
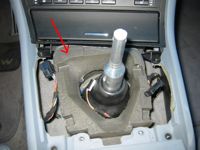
Shifter Insulation |
Step 5: Removing the rubber shift boot
- Pull up on the side of the rubber shift boot and pull it out of the opening in the body.
- Pull the rubber boot off the shifter.
|
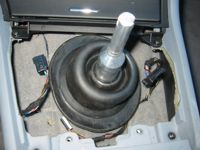
Rubber Boot Released
Rubber Boot Removed |
Step 6: Making room under the car
- From underneath the car, remove the large plastic panel located directly under the shift mechanism. The panel is attached via a number of 8mm bolts.
- Once you remove the plastic panel you will be able to see the a long exhaust heat shield located in the tunnel of underbody.
- Remove the 2 screws at the front of the heat shield
|
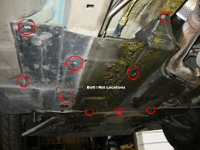
View From Under the Car
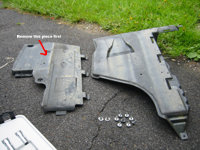
Shields Removed |
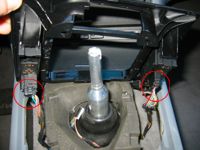
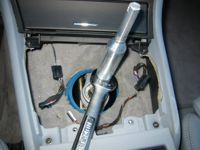
Step 7: Disconnecting the selector rod
- Back inside the car.
- There is a retaining clip (just like the one that came with your kit) on the side of the shifter opposite to the selector rod. Visible from the passenger side.
- UUC says to do this step from under the car but I think its easier to do from inside the car.
- Using your long flat screwdriver, push the clip off the end of the selector rod (see image).
- Back under the car.
- Remove the plastic washer from the end of the selector rod (see image).
- Pull the selector rod out of the shifter (see image).
- Remove the plastic washer from the other side of the selector rod (see image).
|
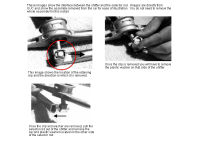
Clip and Selector Rod Removal
Close Up of Shifter Parts |
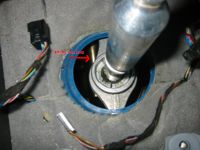
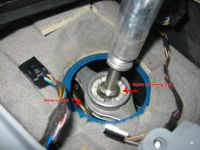
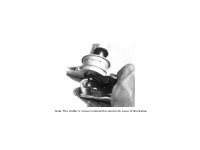
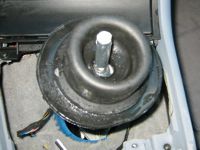
Step 8: Removing the stock shifter
- From inside the car.
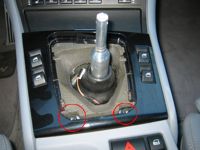
- Follow the shifter down to locate the large white nylon cup that surrounds and the ball on the shifter.
- Use your long nose pliers to rotate the cup and release it from the vehicle (see image).
- Don't worry about damaging the nylon cup - you will not be reusing it (see image).
- Once the cup is released, lift the stock shifter up out of the car.
|
Nylon Cup Removal |
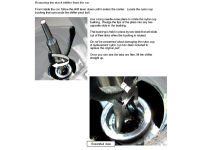
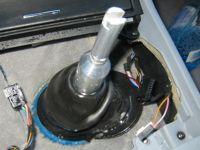
Step 9: Installing the new shifter
- From inside the car.
- Use the included lubricant to coat the inside of the new nylon cup (see image).
- Insert the new shifter through the top of the nylon cup and snap in into place (see image).
- Line up the shifter with the top pointing toward the BACK of the car (see image).
- Push the shifter and nylon cup down into the aluminum carrier (see image).
- Make sure the cups snaps in - try pulling up on the shifter - if it comes out, repeat the previous step.
|
Installing the New Shifter |
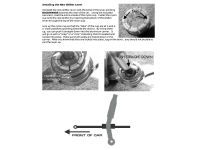
Step 10: Assembling the selector rod and shifter
- From under the car.
- Follow the image to assemble the bearings, spacers and washer.
- Do not lubricate.
- Do not force the bearings into place as you may damage them. If they are very tight, carefully sand the outside of the bearing and try again - do this in VERY small steps.
- Make sure that the yellow washer flat side sits against the outer spacer and the rounded side is facing out.
|
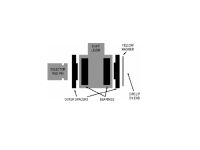
Selector Rod and Shifter
Assembly Diagram |
Step 11: Attaching the retaining clip (the FUN PART)
- From under the car.
- Using your snap ring pliers push the retaining clip into the grove at the end of the selector rod.
- You can also do this with a set of long nose pliers but snap ring pliers make this step 1000 times easier (trust me).
- This is the difficult part of the install as you will basically be working blind.
- If you have a helper, have him/her pull the shifter over toward the driver's side of the car and shine the flash light down from the top to help you out.
- Once the clip is in the grove, make sure to push it all the way on.
|
Attaching the Retaining Clip |
Step 12: Finishing up under the car
- From under the car.
- Replace the two bolts in the heat shield.
- Replace the plastic cover.
- You're done under the car! You can now lower the car off a lift or off jack stands. If you are using ramps, leave the car as it for now.
- Everything from here on out is done from inside the car.
|
|
Step 13: Adjusting shifter height (if desired)
- The UUC shifter comes adjusted to its top position from the factory (roughly the same height as the factory shifter).
- If you want to retain this height, use your 24mm wrench to tighten the bolt at the bottom of the fat part of the shifter (I've noticed that the bolt is not tight from the factory and will cause your shifter to make noise if it is not tightened).
- If you want to lower the shifter (actually knob height) loosen the bolt at the bottom of the fat part of the shifter a couple of turns - do not back it all the way out. Push the top of the shifter down as much as desired (this take a bit of muscle) - you can test final height by test fitting the knob.
- Once you are happy with shifter height, tighten the bolt.
|
Tightening the Height Adjustment |
Step 14: Reinstalling the rubber shift boot
- Spray the edges and the center section of the rubber boot with Windex (this will make it much, much easier to install).
- Locate the arrow on the edge of the rubber boot and line it up so that is faces forward.
- Slide the boot on to the shifter.
- Push the large under the lip of the opening in the floor - make sure you do not push the boot all the way through - there is a smaller lip on top of the large lip - this stays inside the vehicle.
- Work your way around the boot to make sure it is seated properly all the way around.
|
Rubber Shift Boot 'Windexed Up'
Rubber Shift Boot Partially In |
Step 15: Reassembling the center panel
- Reverse the steps you took in step 4.
- Make sure that the power lead for the knob is accessible and not trapped under the shifter insulation.
|
|
Step 16: Reinstalling the shift knob
- The factory knob simply snaps down into place.
- After the knob is snapped into place, reconnect the knob illumination power lead.
- Align the shift boot frame and snap it down into the center panel.
- Done! Go for a drive.
|
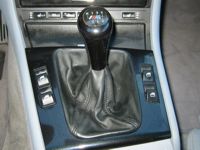
Completed Install |

|