|
 |
This install takes 30 - 45 minutes. This does not require any special skills - just a little patience and care not to damage the car's interior.
Click on the images for larger views. |
WARNING:
- It is rather important that you read the safety and other instructions included with your Schroth Rally4 harness. Failure to properly install, adjust and wear the harness can cause serious injury or death. If you feel that something in the instructions differs from what it shown below - USE THE INSTRUCTIONS! Its your life, use your head!
|
Step 1: Getting the required items together
This install requires:
- 1 Schroth Rally 4 Harness
- T50 Torx Bit
- Long Flat Screwdriver
- Small Flat Screwdriver
- Utility Knife
- A BMW M3 (E46)
- 30 - 45 minutes of free time
|
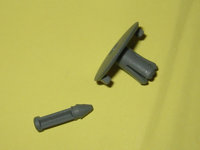
 |
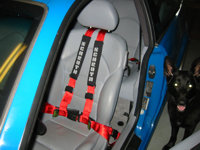
Schroth Rally 4
(dog & shoulder pads not included) |
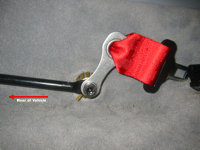
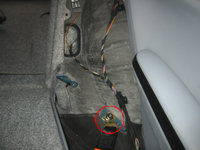
Step 2: Start with the lap belt connector
- First things first, open the rear side window on the driver's side.
- Remove the rear passenger floor mat and set aside.
- There is a rail which serves as the mounting point for the stock shoulder belt (see image).
- On the front end of the rail there is a black cap - use your fingers or a flat screwdriver to pry it off - easiest to do by lifting up where the cap goes around the rail itself and pulling back. (see image)
|
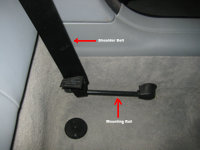
Mounting Rail
Cap Removed |
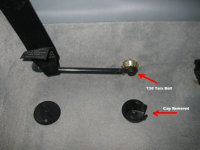
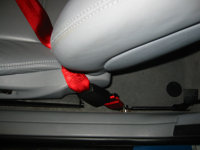
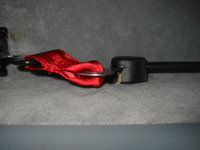
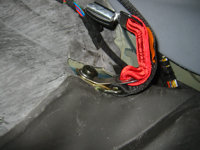
Step 3: Installing the lap belt connector
- Use a Torx T50 bit to unscrew and pull out the front rail bolt (see above image).
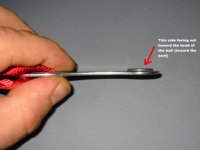
- Insert the Schroth lap belt connector tab onto the bolt with the raised side of the metal tab pointing toward the head of the bolt. (see image)
- Snug the bolt back down but don't tighten it completely yet.
|
Mounting Tab
Connector in Place |
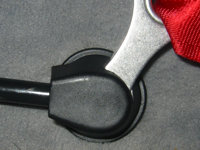
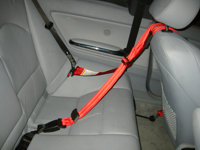
Step 4: Setting the correct angle
- The tab needs to be mounted in such a way that when the harness is worn it lines up with the lap belt (see images)
- A good way to do this is to temporarily "install" the harness and click the lap belt in - this will give you a very good idea of how things will be once all is done.
- Once you get the correct angle, torque the bolt down to 30 ft lbs.
|
Lap Connector Angle (side)
Lap Connector Angle (front) |
Step 5: To cut or not to cut - that is the question
- OK, assuming that you have an IQ above room temperature, you've noticed that the stock cap will no longer fit on the rail with the connector tab installed.
- You have 2 basic options: Leave the bolt exposed (ugly) or cut the cap so that it fits over the tab.
- If you choose to cut the cap see the attached images for a rough template on how I ended up doing it - there may be better solutions - this one happens to be the one I ended up with.
- Use a sharp utility knife to do this but keep in mind that if its sharp enough to go through the cap its more than sharp enough to take off a finger.
- The good news is that you have up to 3 attempts at this as messed up caps can bet swapped to the back of the rail upside down so as to not show the damage or swapped to the other side of the car (as occurred with my first attempt :-)
|

Close Up of Trimmed Cap I
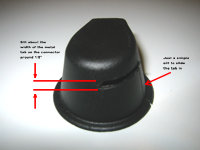
Close Up of Trimmed Cap II
Close Up of Trimmed Cap Installed I
Close Up of Trimmed Cap Installed II |
Step 6: On to the back seat
- You have to remove the bottom of the back seat to gain access required in order to remove the side bolster.
- The bottom of the back seat simply lifts out.
- Pull up and toward you about 8-10" in from the sides of the bottom cushion (see image).
- Once the cushion releases, pull it about 3" forward and then carefully pull it out of place and remove from it from the car.
|
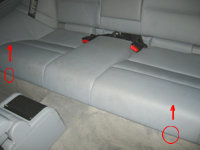
Releasing the Cushion |
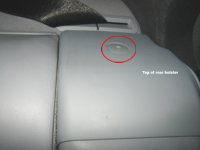
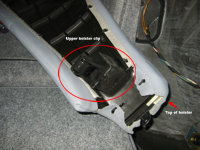
Step 7: Popping the pin at the top of the bolster
- Take the rear shoulder belt and wrap it around the rear seat head rest to get it out of the way.
- At the top of the bolster you will see a plastic trim piece at the top of which there is a plastic retaining clip (see image).
- Use a small screwdriver to pop the pin up and out. The pin has two pieces (see image) a center shaft and the clip body - make sure you don't lose the parts.
- Pull the trim piece up and toward the center of the car - in the area where the shaft for the rear window enters the trim piece there is a clip that allows you to free things up further, release that clip as well (see image - view is from the underside of the trim piece).
|
Top Retaining Pin
Retaining Pin

Rear Window Shaft Area |
Step 8: Removing the bolster
- Fold down the seat backs - but don't sit on top of the folded down seat - you can damage the surface of the seats on the exposed clips from the seat bottom.
- Much of this is kind of hard to illustrate with photographs.
- There is a very fragile pin at the outside bottom of the bolster - apparently most people who try to get it loose end up breaking it - worry not, if you break it it won't matter a damn bit. You can try to release it by pulling up on the bottom outside of the bolster - if you reach up under the bolster you'll be able to feel it (break).
- The real supports for the bolster are a large clip at the top, a tab on the inside bottom and the through piece that is attached to the back of the rear seat bottom (that you've already removed).
- You need to release the clip at the top. See the image with the bolster out to locate where the clip is. Once you locate it, use a screwdriver to push it down and work the bolster toward the front and up and out of the car.
|
Bolster Removed
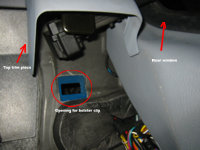
Upper Clip Point
Removed Bolster |
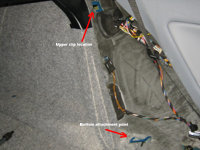
Step 9: Attaching the rear connecting point
- Locate the lower rear shoulder belt attachment point.
- Use your T50 Torx bit to remove the bolt securing the shoulder belt.
- Install the connecting point tab with the raised part toward the top of the bolt.
- Reinstall the bolt with the connecting point and the rear shoulder belt.
- Before tightening things back down, slightly bent the tab on the connecting point up (roughly the same angle as the OEM rear shoulder belt mount) - this will help things line up once the bolster is reinstalled (see image).
- Torque the bolt back down to 30 ft lbs.
|
Rear Shoulder Belt Attachment Point
Schroth Connecting Point in Place and Bent Up |
Step 10: Reinstall the rear seat bolster
- See images in Steps 7 & 8.
- Start by making sure the tab at the lower inside end of the bolster goes through the attachment point.
- Once the bolster is seated at the bottom, push the top end in, seating the clip back in place (the bolster will snap in at the top).
- Align the upper trim piece and insert the body of the pin through the top making sure it goes through the bolster and into the car's attachment point.
- Once the pin is seated, push in the center piece of the pin to lock it in place.
- Snap the side of the trim piece back in place (the section around the rear window push arm).
- Make sure the Schroth connecting point is still accessible, if not pull it out from under the bolster.
|
|
Step 11: Reinstall the rear seat bottom
- See images in Step 6.
- Carefully get the rear seat cushion back in the car and note the tabs at the rear edge of the cushion which need to go through the openings in the seat bolsters.
- Line up the aforementioned tabs and the back of the seat cushion and then push down forward on the front to lock it in place.
- Dig the rear center seat belt and passenger rear seat belt hardware and fold it back in place and push the leather tabs back in around the seat belt mounts to cover them back up.
- You're officially done with the install!
|
|
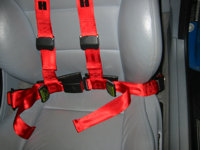
Step 12: Test fit the harness
- Run the rear end of the harness through the opening between the headrest supports.
- Attach the section with the smaller tab to the connecting point you just installed.
- Attach the other tab to the driver's side rear passenger seat belt receptacle.
- Attach the front lap belt.
- Get in car, adjust as per manufacturer's instructions, make engine noises and pretend to be a race car driver in your garage (spouse and pets may find this disturbing).
|
Rear Attachments
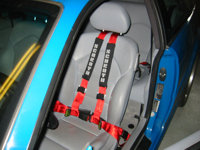
Installed Harness |

|