|
 |
This install takes 20 - 30 minutes of actual work and a bit of time to allow the old fluid to drain. This is really easy, if not a little messy.
Click on the images for larger views. |
WARNING:
- Your car must be on a lift or up on jack stands to do this - you should not do this fluid change with only one end of the car up in the air as you will have problems completely draining the old fluid and not over/under filling with new fluid. The car needs to be level to do this correctly.
|
Note:
- Go to a marine supply and buy a gear oil pump they sell for use with outboard engines. This will set you back around $10 but will save you an enormous amount of aggravation caused by the use of a regular siphon pump (trust me). I've since seen these gear oil pumps at WalMart as well.
|
Step 1: Getting the required items together
This install requires:
- 2 Qts. of Royal Purple SyncroMax. Probably a good idea to buy 3 Qts.
- A lift or hydraulic jack and jack stands (see how to jack up the car here)
- Socket wrench
- 8mm socket
- 17mm socket
- Torque wrench (with a range of 50ft lb +)
- Breaker Bar
- Gear Oil or Siphon pump
- Drain pan (oil drain pan works great)
- A BMW M3 (E46).
- 20 - 30 minutes of free time.
Note: You should warm up the transmission fluid before draining it. Drive the car around enough to warm things up (don't just let it sit and idle).
|
 |
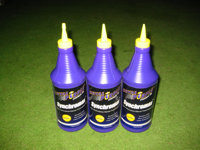
Royal Purple SyncroMax |
Step 2: Getting Started Under the Car
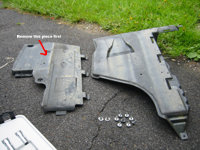
- Two of the plastic shields have to be removed in order to gain access to the transmission drain and fill plugs.
- Work from the driver's side of the car and remove the two shields pictured here -->
- The shields are have a series of 8mm screws and bolts as well as being interlocked with tabs.
- Remove the smaller shield that is closest to the side of the car first.
- Make a mental note at to how these are installed - this will make reinstalling them MUCH easier.
|
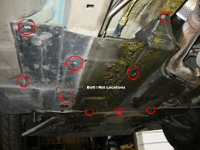
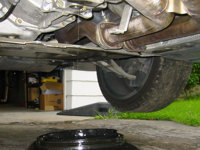
View From Under the Car
Shields Removed |
Step 3: Locate the Transmission Fill and Drain Plugs
- The drain and fill plugs are located on the driver's side of the transmission.
- Grab your 17mm socket, breaker bar and drain pan.
|
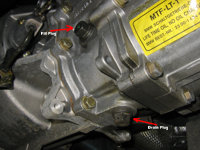
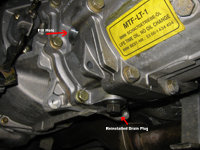
Drain and Fill Plugs |
Step 4: Draining the Old Fluid
- Remove the FILL plug first - these are very tight and may require the use of a breaker bar (see image in previous step).
- Some fluid may drain from there so have your drain pan ready.
- Remove the drain plug once you have the fill plug under control (see image in previous step).
- Let the fluid drain for a while.
- My fill plug had a dab of green paint in the center. If your plugs do not have some type of mark to differentiate them, make sure you keep track which on is which - you don't want to interchange these.
|
Draining the Fluid

Plugs |
Step 5: Filling the Trasmission Fluid
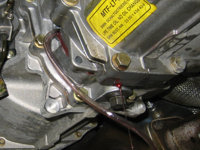
- Once the fluid is completely drained reinstall the drain plug (see image). Torque it to 37 ft lbs.
- Capacity is between 1.8-2 Qts. and you will need some sort of a pump to get the fluid up into the case.
- Keep pumping transmission fluid into the transmission until it starts to overflow out of the fill hole (see image).
- Once fluid starts to overflow, the case is full. Reinstall the fill plug and torque it to 37 ft lbs.
|
Drain Plug Replaced
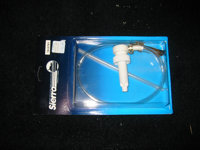
Marine Gear Oil Pump

Filling the Case
Filling the Case |
Step 6: Replace the Plastic Shields
- Reverse the order in which you removed the shields.
- The shields have interlocking tabs which can make things a pain when putting them back on.
- Take your time and then snug up the screws/bolts that hold the shields in place and you're done.
|
|

|