|
 |
This install takes 5 - 10 minutes.
Click on the images for larger views. |
Step 1: Getting the required items together
This install requires:
- Turn Signal and/or Brake Bulbs
- A BMW M3 (E46).
- 5 - 10 minutes of free time.
|
 |
|
Step 2: Releasing the rear light assembly
- From inside the trunk, locate the light assembly at the rear of the trunk (directly behind the exterior lens).
- Note the interior light located at the back of the assembly.
- At the fender side of the interior light note the location of the release tab (see image).
- Push the tab toward the center of the car - you will feel the assembly come free.
|
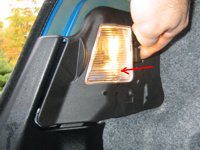
Releasing the Tab
Releasing the Assembly |
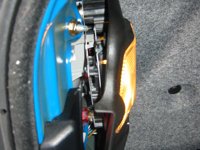
Step 3: Inspecting the assembly
- Pull the assembly back and let it lay on the trunk floor.
- Note that there are 3 bulbs - 1 Orange (turn signal) - 2 Clear (brake) - see image.
|
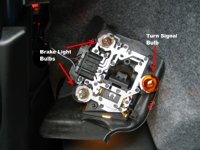
What Goes Where |
Step 4: Removing the bulb(s)
- Press down gently on the bulb you wish to remove.
- While depressed, rotate the bulb counter clockwise to release it from the socket.
|
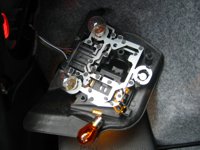
Exposed Socket and Bulb |
Step 5: Replacing the bulb
- The bulb has three tabs along its base.
- The bulb will only fit into the socket one way (no chance of a screw up!)
- Rotate the bulb to align it with the recesses in the socket and gently push it in.
- You will feel the bulb hit bottom and depress the bottom of the socket - at this point rotate it about a quarter turn to clockwise, until it stops.
- Make sure the bulb is in place by giving it a gentle tug upwards.
|
|
Step 6: Reassembly
- Note the holes inside the light lens assembly from inside the trunk.
- Line up the bulbs with the holes and snap it back into place (see image for step 2 - "Releasing the Assembly").
- You're done!
|
|

|