|
|
 |
 |
This job takes about 30 to 45 minutes of actual work (once you have the car off the ground and wheels off). This is pretty easy but requires attention. If you are not comfortable or competent with working on your brakes, leave it to a professional!
This DIY was provided by Keith Fiorucci (KEF at RoadFly) - I appreciate the time, pictures and write ups he provided and hope the rest of the M3 crowd finds the information useful and helpful.
Click on the images for larger views. |
WARNING:
- The information provided at "M3.MADRUSSIAN.NET" web site is "as is" with all faults and without warranty of any kind, expressed or implied, including those of merchantability and fitness for a particular purpose, or arising from a course of dealing, usage or trade practice. "M3.MADRUSSIAN.NET" web site nor it's owner/creator, can not and does not provide any warranty, expressed or implied, about the accuracy or use of information found on "M3.MADRUSSIAN.NET" web site. The user assumes that risk.
- Under no circumstance will "M3.MADRUSSIAN.NET" web site nor it's owner/creator, be liable to any person or business entity for any direct, indirect, special, incidental, consequential, or other damages based on any use of this web site or any information contained herein, including, without limitation, any lost profits, business interruption, or loss of programs or information.
- THE USE OF THIS DIY IS FOR YOUR REFERENCE ONLY. M3.MADRUSSIAN.NET AND ITS OWNER/CREATOR DISCLAIM ALL LIABILITY FOR DIRECT, INDIRECT, INCIDENTAL, OR CONSEQUENTIAL DAMAGES OR INJURIES THAT RESULT FROM ANY USE OF THE EXAMPLES, INSTRUCTIONS OR OTHER INFORMATION IN THIS DIY.
|
Note:
- Your rear wheels must be off the ground to change brake rotors. See Getting car up on jack stands DIY.
- I assume that your car is already up on a lift or on jack stands and the wheels are off.
- If you are planning on changing the pads at the same time, see Rear Brake Pad DIY. You should follow the steps for removing the caliper at the brake pad DIY rather then those in this one as the caliper will have to be removed from the carrier and the caliper will need to be compressed.
|
Step 1: Getting the required items together
This job requires:
- European Spec Rear Rotors: 34-11-2-282-303 Left & 34-11-2-282-304 Right
- A lift or some other method of getting the rear wheels off the ground.
- 16mm Socket and Socket Wrench
- 16mm Open Wrench
- 6mm Allen (hex) Socket
- Dead-Blow Hammer or Rubber Mallet
- Torque Wrench (16 - 67 Nm range)
- Anti-Seize Compound
- Brake Cleaner
- A box or something else to either set the caliper on or a bungee cord, etc.
- A BMW M3 (E46).
- About 30 - 45 minutes of free time.
|
 |
|
Step 2: Lets Start On the Driver's Side
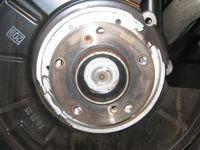
- Look behind the caliper and locate the two 16 mm Hex Head bolts. The image shows the location of the bolts with the rotor already removed.
- Using the 16 mm socket and wrench loosen these bolts (these are not toqued nearly as high as the front)
- Remove one of the bolts first, but before removing the second have your caliper securing system ready. I used a card board box to set the caliper on - do not let it dangle from the brake lines.
- Remove second bolt and pull the entire assembly off the rotor, and set in on your box
- Be careful when removing the caliper; the Brake Line and Brake Wear Sensor Wire (passenger's side only) are still attached.
|
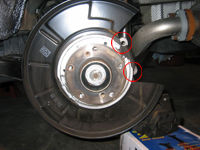
Caliper Retaining Bolt Locations
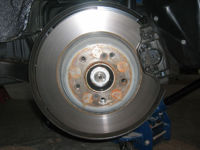
Rear Caliper
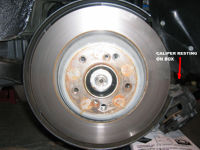
Removed Caliper "Resting" |
Step 3: Removing the Old Rotor
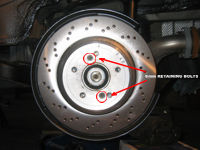
- Using your rachet and 6mm hex socket, loosen and remove the two set screws that are securing the rotor to the hub.
- Make sure that your Parking Brake is not on otherwise the rotor may be very difficult to remove.
- After removing the two set screws, the rotor will come off but may require a few blows from the dead-blow hammer or rubber mallet.
- Once loosened up, remove the old rotor and set it aside.
|
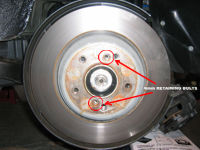
Rotor Retaining Bolts
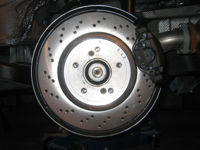
Hub with the Rotor Off |
Step 4: Installing the New Rotor
- Take the Left Rear Rotor (34-11-2-282-303) and use brake cleaner to clean off any shipping oil, etc.
- Line up the new rotor with the lug holes and set screw holes.
- Replace the two 6mm set screws and torque them to 16 Nm.
|
Left Rear Rotor In Place |
Step 5: Reinstalling the Caliper
- Test fit the caliper - you may have to spread the pads apart a bit to get it to fit on the new rotor - to do this use the handle of a large screwdriver or hammer and spread the pads.
- Place the caliper back in position.
- Apply some anti-seize on the 16mm hex bolts before putting them back in.
- Torque the bolts down to 67 nm.
- Your done on this side of the car - repeat for the other side (right side rotor part number is 34-11-2-282-304)
|
Caliper Back In Place |

|
|