|
 |
This job takes about 20 minutes of actual work (once you have the car off the ground and wheels off). This is pretty easy but requires attention. If you are not comfortable or competent with working on your brakes, leave it to a professional!
YOU MUST BLEED YOUR BRAKE SYSTEM AFTER INSTALLING NEW BRAKE LINES!
DO NOT GET BRAKE FLUID ANYWHERE NEAR PAINTED SURFACES - This stuff will take paint off at least as well as paint thinner!
Click on the images for larger views. |
WARNING:
- The information provided at "M3.MADRUSSIAN.NET" web site is "as is" with all faults and without warranty of any kind, expressed or implied, including those of merchantability and fitness for a particular purpose, or arising from a course of dealing, usage or trade practice. "M3.MADRUSSIAN.NET" web site nor it's owner/creator, can not and does not provide any warranty, expressed or implied, about the accuracy or use of information found on "M3.MADRUSSIAN.NET" web site. The user assumes that risk.
- Under no circumstance will "M3.MADRUSSIAN.NET" web site nor it's owner/creator, be liable to any person or business entity for any direct, indirect, special, incidental, consequential, or other damages based on any use of this web site or any information contained herein, including, without limitation, any lost profits, business interruption, or loss of programs or information.
- THE USE OF THIS DIY IS FOR YOUR REFERENCE ONLY. M3.MADRUSSIAN.NET AND ITS OWNER/CREATOR DISCLAIM ALL LIABILITY FOR DIRECT, INDIRECT, INCIDENTAL, OR CONSEQUENTIAL DAMAGES OR INJURIES THAT RESULT FROM ANY USE OF THE EXAMPLES, INSTRUCTIONS OR OTHER INFORMATION IN THIS DIY.
|
Note:
- Your rear wheels must be off the ground to change brake lines. See Getting car up on jack stands DIY.
- I assume that your car is already up on a lift or on jack stands and the wheels are off.
|
Step 1: Getting the required items together
This job requires:
- StopTech or Similar SS Brake Lines
- A lift or some other method of getting the rear wheels off the ground.
- 14mm Flare Wrench (some time in 2003 BMW switched from lines with 14mm fittings on both ends of the OEM lines to using a 17mm fitting at the top of the line and 14mm at the bottom - if you have an 03 car your may also need a 17mm flare wrench).
- 11mm & 10mm Open Wrenches
- Large Flat Screwdriver
- Pliers
- Drain Pan
- A BMW M3 (E46).
- About 20 minutes of free time.
|
 |
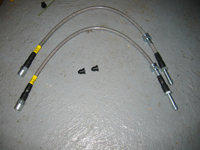
StopTech SS Lines |
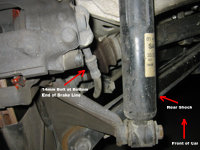
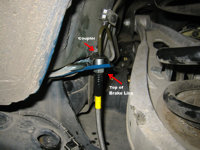
Step 2: Lets Start On the Driver's Side
- First locate the things you are going to be taking off - follow the brake line from the caliper to its entry point on the body and note the bracket to which the line is attached.
- Locate your drain pan under where the top of the line is attached (part going into the body) (see image).
- Using the 14mm flare wrench get a hold of the bolt at the top of the brake line and use your 11mm open wrench to loosen the line coupling (see image).
- You should only need to loosen the coupler a turn or two with the wrench, it should unscrew the rest of the way by hand.
- Once the coupler starts to unscrew, brake fluid will start to spill - keep the caps that came with your brake lines handy and cap off the metal line coming out of the wheel well off as fast as you can.
|
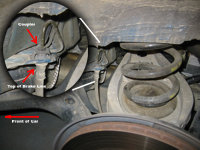
Top of Brake Line
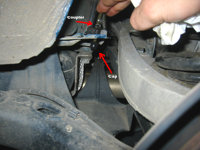
Top Connection Off - Cap On |
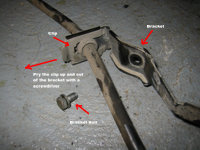
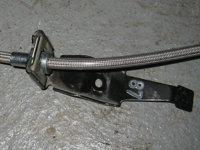
Step 3: Removing the Bracket
- There is a bracket that attaches the to the swing arm and holds the brake line in place.
- If you follow the line back from the front, you will be able to feel (hard to actually see) the bracket.
- In the center of the bracket you will feel/see a 10mm bolt.
- Use an open wrench to remove this bolt and release the bracket from the suspension - make a mental note of how the bracket attaches to the swing arm (note the front of the bracket and the recess it fits in the arm).
- Picture was taken from under the car shooting out toward the outside.
|
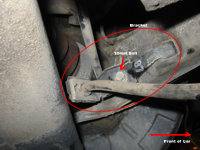
Brake Line Bracket |
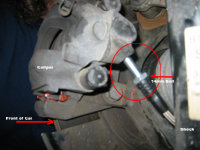
Step 4: Removing the Line From the Caliper
- Now that the top of the line and the center have been released follow the line down to the caliper.
- The nut section of the line is about an inch or so up from where the line goes into the caliper.
- Use your 14mm flare wrench to loosen the line and then use your hands to turn the line the rest of the way out (you have to turn the line as a whole to get it out of the caliper)
- Keep in mind that it still has some brake fluid in it so be careful with it around the car.
|
Bottom End of Brake Line
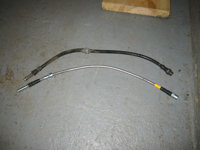
StopTech vs. OEM Line |
Step 5: Removing the Line From the Bracket
- Now that you have the line out of the car you will need to remove the bracket from the line.
- The bracket has a clip that needs to be pulled out in order to remove the old line.
- Push the clip up and out with a large screwdriver (see image).
- Work the line out of the clip.
|
Brake Line Bracket
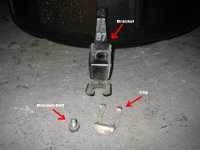
Bracket Removed from Line |
Step 6: Securing the New Line into the Bracket
- Test fit the new line into the bracket. The line goes into the bracket at the machined aluminum section with the "bolt" end pointing out of the bracket (see images).
- It is likely that the clip will be loose when you test fit. If this is the case remove the clip and bend the two prongs of the clip in (toward where they contact the bracket). Hold the end of the clip with a pair of pliers and bend the prongs about 3/8" down. Try it to see if it clips in securely - repeat as needed till you get a secure fit.
|
Close Up of Bracket

Close Up of Bracket |
Step 7: Installing the Bottom End of the New Brake Line
- Take the threaded end of the line and screw it in the opening in the caliper. You'll have to turn the line itself to screw it in.
- This can be a bit of a pain since the bracket will be turning with the line and its tricky to get the correct angle to start the line - just keep at it.
- Tighten it down with your 14mm flare wrench.
|
New Line Attached at the Caliper |
Step 8: Reattaching the Bracket
- Route the line back through and line up the bracket with its front tab in the recess in the swing arm.
- Install the 10mm retaining bolt and tighten it down.
- Image is from behind the swing arm shooting outward.
|
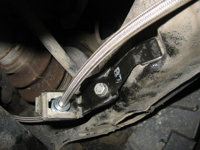
Bracket Shown from Behind Swing Arm |
Step 9: Attaching the Top of the Brake Line
- This can get a little messy.
- Remove the rubber cap you used to block the metal brake line.
- Insert the new brake line in from below the metal bracket and turn the coupler into the line by hand.
- Once you have it snugged down by hand use the 14mm flare wrench to hold the top of the line and the 11mm to tighten the coupler into the line.
- You're Done! Now go do the other side - AND REMEMBER TO BLEED THE SYSTEM ONCE ALL THE LINES ARE IN!
|
Attaching Top of Brake Line |

|