|
 |
This install takes 5 - 10 minutes. This is a very easy install but be careful not to break the reflectors (especially the end that points toward the rear of the car).
Click on the images for larger views. |
Step 1: Getting the required items together
This install requires:
- 1 Set of Bimmian Painted Reflectors (or any other replacement reflectors)
- Small Flat Screwdriver
- Small Rag
- A BMW M3 (E46).
- 5 to 10 minutes to an hour of free time.
|
 |
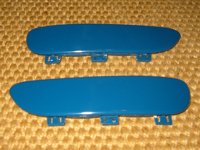
Bimmian Painted Reflectors (LSB) |
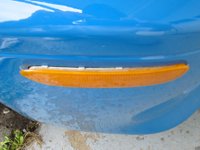
Step 2: Getting acquainted with the reflector
- Take a few seconds to examine the reflector - this will make it a lot easier to understand how it installs.
- Note the 4 tabs at the top of the reflector and the 3 tabs at the bottom.
- Also note the spring on the bottom edge of the reflector (see image).
|
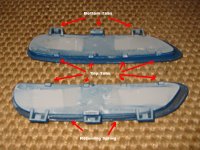
Getting acquainted |
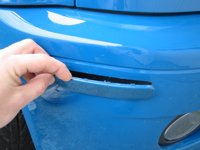
Step 3: Removing the OEM reflectors
- Wrap a small, flat screwdriver with a rag to prevent it from scratching the car (see image).
- Insert the wrapped screwdriver behind the upper rear edge of the reflector (about an inch from the end - see image).
- Leverage the reflector out of the bumper - do this in small steps, moving in about 1.5" steps until all of the 4 top tabs are released and exposed (see image).
- Remove the reflector by tilting it toward yourself and then up.
|
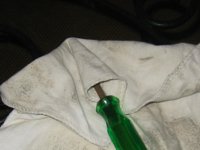
Screwdriver w/Rag
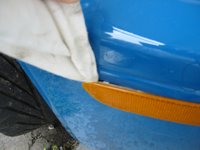
Screwdriver Started at Edge of Reflector
Upper Tabs Exposed |
Step 4: Installing the new "reflector"
- Note the spring at the bottom of the reflector - this will compress once installed and server to retain it in place.
- Place the lower section (the spring) on the lower edge of the opening in the body. The 3 lower tabs will be inside the bumper (see image).
- Line up the reflector and tilt the top forward.
- Gently snap the top tabs in one by one.
- Make sure the reflector is flush and you're done.
- Repeat for other side.
|

Bumper Opening
Lower Tabs Inserted
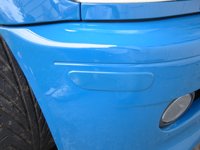
All Finished |

|