|
 |
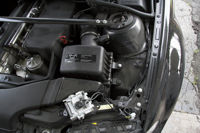
This install takes 30 to 45 minutes. This is pretty simple to do but I do think the K&N Typhoon kit requires a bit of re-engineering in order fit correctly in the car. Working with the MAF always requires a degree of care as well. If you can change your oil and air filters this should not present a problem.
Click on the images for larger views. |
Step 1: Getting the required items together
This install requires:
- 1 K&N Typhoon Cold Air Intake Kit
- Flat Screwdriver
- 10mm Socket, Extension and Socket Wrench
- 2 13mm Open Wrenches
- Set of metric Allen wrenches
- A BMW M3 (E46).
- 30 to 45 minutes of free time.
|
 |
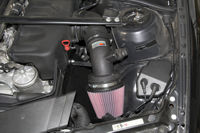
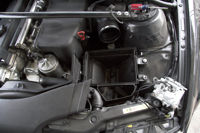
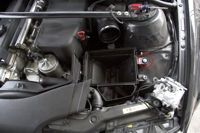
K&N Typhoon Cold Air Intake |
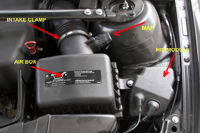
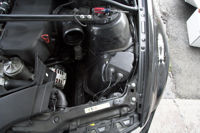
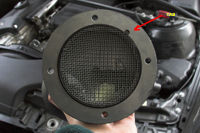
Step 2: Disconnecting the HID Control Module
- Open the hood.
- Locate the air filter housing.
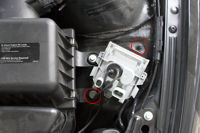
- Locate the black HID Control Module to the right of the air box (see image)
- There are 2 plugs on the front of the module - don't just yank on them
- Roll back the rubber boots and note that both plugs have a release tab on the front (side toward the front of the car).
- Release the tabs and pull out the plugs
|
Taking Inventory
Plugs Exposed

Unplugged |
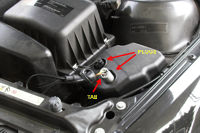
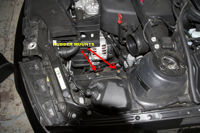
Step 3: Removing the HID Control Module
- Now you have to remove the plastic cover from the HID Control Module
- There are 3 plastic tabs keeping it in place (see image)
- The tabs are forked at the end - you can gently squeeze the tab ends in order to remove them without breaking anything
- Next remove the 10mm nut (back) and 10mm bolt (front) in order to remove the module (note to self: do not drop nuts, bolts or washers as having to jack up car, remove plastic under trays, find the shit you dropped, replace under tray and lower car back down is a real pain in the ass)
- Pull the module out and set it aside
|
Tab Locations
Cover Off - Nut/Bolt Locations
HID Control Module Removed |
Step 4: Disconnecting the MAF and Removing the Top of the Filter Housing
- Press the tabs on the side of the MAF plug and gently pull it off.
- Loosen the silver hose clamp at the back of the filter housing (as much as you can short of taking the clamp all the way apart)
- Release the two silver clamps of the right side of the filter housing
- Pull the top part of the filter housing to the right and up to release it (it has a set of locking tabs on the left (engine) side)
- Gently rotate the top of the filter housing to work it out of the intake hose.
- The is a large rubber gasket at the end of the portion of the filter housing you just pulled out, take it off the and set it aside.
- Lift out the air filter element
|
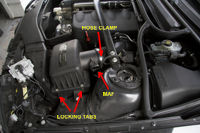
MAF and Locking Tab Locations
Top Of Filter Housing Off |
Step 5: Yank the Snorkel (well don't really yank)
- A genuine Madrussian short cut
- K&N says to pull the plastic pins and release the whole side of the front of the OE intake - really no need to do that
- Having removed those before (when installing UDP's) I'd rather not do it again - they brake and are generally a pain in the ass
- The good news is that the snorkel will come out without having to release the clips - just wiggle it out.
|
Snorkel and Filter Out |
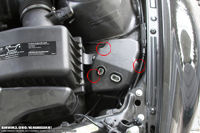
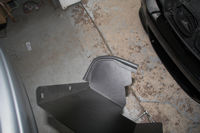
Step 6: Pulling Out the Bottom of the Filter Housing
- Remove the remaining 10mm bolt (see image) and pull the bottom of the filter housing out of the car
- There is a rubber insert where the bottom of the filter housing sat - this just pulls out - remove it
|
Bolt Location
Housing Fully Out |
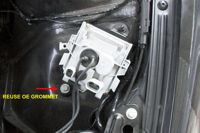
Step 7: Reinstalling the HID Control Module
- The K&N kit comes with a spacer for the front side of the HID Control Module - I found the spacer to be too short for a correct fit (I could not get the cover back on with it)
- To remedy this I simply pulled one of the grommets and its metal inserts from the mounting brackets on the bottom of the OE filter housing.
- Since this is exactly what was there before this solution works perfectly.
- Reinstall the HID Control Module exactly in reverse of the way it came out
- Snap the plastic cover back on
- Plug the 2 plugs back in - you're done with it.
|
Grommet Swap
Back Together |
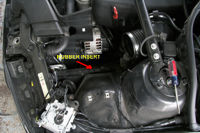
Step 8: Installing the Rubber Heat Shield Mounts
- The K&N kit came with 2 rubber mounts for the bottom of the heat shield.
- These simply screw in where the rubber insert that sat at the bottom of the OE housing was (there are 2 bolts there)
- These may be a little tight, try to get them as far down to the bottom as you can - they should sit flush with the car
- This is also a good time to remove the 10mm chrome bolt that holds the dipstick in place (see image)
|
Rubber Mounts

Dipstick Bolt |
Step 9: Installing the Heat Shield Gasket
- This is a bit of a pain in the butt
- Work the gasket onto the K&N heat shield and try to follow the curvature of the thing as much as you can - this may well take more than one try :-)
- Start at the bottom of the heat shield and work from there (see image)
|
Gasket on Heat Shield |
Step 10: Installing the Heat Shield
- Work the heat shield in until it slides onto the two rubber mounts you put in and onto the exposed dipstick bolt
- Line everything up and tighten the heat shield down
- Check to make sure the air hose from the fog light intake is not obstructed
|

Heat Shield in Place |
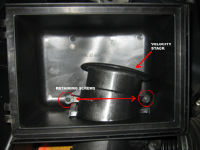
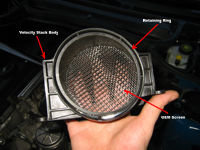
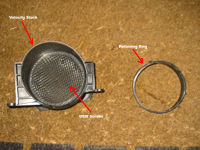
Step 11: Removing the Velocity Stack
- Grab the top of the OE filter housing and look inside
- There are 2 screws that are used to retain the velocity stack (see image)
- Once the screws are out, the velocity stack will slide right up and out of the air box top.
|
Velocity Stack In Air Box
Velocity Stack Removed |
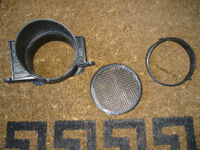
Step 12: Removing the OEM Screen
- Once the velocity stack is out of the vehicle pull out the retaining ring from the back of the velocity stack.
- Push the OEM screen out of the velocity stack body and set aside.
|
Retaining Ring Removed
OEM Screen Removed |
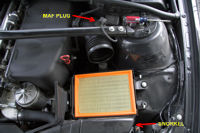
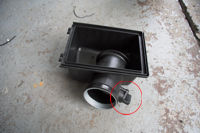
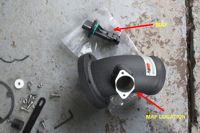
Step 13: Removing and Installing the MAF
- A word of caution - the MAF isn't cheap to replace so be careful with it
- Using the supplied "safety" Torx wrench pull out the 2 screws that hold the MAF in place and pull it out of the OE filter housing top
- Grab the tube section of the K&N intake and insert the MAF - it can only go one way
- Using the bolts supplied with the kit secure the MAF (don't gorilla it)
|
MAF in OE Housing
MAF and K&N Intake Tube |
Step 14: Installing the MAF Screen
- Line up the tab on the OE MAF screen with the slot in the K&N intake tube and push it into place
- Line up the rubber gasket that came with the kit
- Slide one of the provided bolts through and slide the new velocity stack on top
- Just start the first bolt
- Now start the rest of the bolts - make sure they go through the gasket.
- Once all the bolts are in place tighten things up
|
OE MAF Screen Installed
Gasket In Place
Velocity Stack In Place |
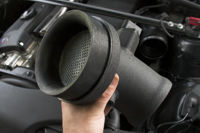
Step 15: Installing the Rubber Gasket, Bracket and Cone Filter
- Slide the OE rubber gasket you removed from the back of the upper section of the OE filter housing (this is one of the worst designed parts of the K&N kit)
- Install the metal bracket - if you think of the intake tube as a "U" shape the tab on the bracket should point toward the bottom of the "U" (this another poorly thought K&N out piece)
- Slide the K&N cone filter on but don't tighten it down (BTW: DON'T OIL THE FILTER - ITS PRE OILED FROM THE FACTORY)
|
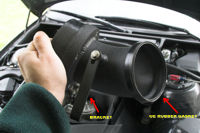
Bracket and Gasket in Place |
Step 16: Installing the Assembled Intake
- Work the intake into place - start by inserting the back of the intake tube into the car's intake manifold tube.
- The rubber gasket will become a pain in the ass at this point since nothing will stop it from sliding up the K&N intake tube (stupid design "feature")
- The car's tube actually has a lip inside that will not let the gasket in too far. Once the K&N tube is in work around it to make sure the rubber gasket is seated.
- Align the intake so that the bracket you attached to the tube lines up with its slot in the heat shield and snug down the clamp on where it joins the car's intake tube - don't gorilla it yet
- I was pretty uncomfortable with the position the intake wants to sit in as designed by K&N as it puts the MAF pretty high - high enough that it looked like it would hit the underside of the hood when closed - probably not the best idea
- I tightened the bracket at the heat shield (use your pair of 13mm open wrenches), loosen the intake clamp a little bit and then rotated the intake clockwise to force the position of the MAF down - this put about a 30 degree bend in the bracket right at the intake tube which should not be an issue - as a free "benefit" this seems to put the filter into a much better position as well)
- Once you're happy with the filter's position tighten everything down including the cone filter itself. The clamp at the end of the intake should be as tight as you can reasonably get it.
- The filter should not be touching the car anywhere along its circumference.
- Reconnect the MAF
|

Bracket at the Heat Shield
Everything in Place |
Step 16: Before Heading Off to the Red Light Special Olympics
- Do a final check to make sure everything is in place and tight
- Start the car and listen for any leaks or odd noises - if you hear anything shut it down and recheck your work!
- At idle you should hardly hear a difference in sound levels form OE - if you are hearing a lot of noise something ain't right.
- If everything sounds and looks good go for a short spin, again listen for noises, etc.
- After your spin double check everything again.
|
|

|