|
 |
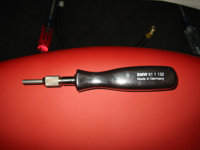
This install takes 45 minutes to an hour. This one is not difficult per say but if you do not have the super secret special BMW round pin removal tool (61 1 132) it can be a royal pain in the ass. Oh, and you're almost assured skinned knuckles.
Though a "tool" can likely be fabbed up from some 4mm (ID) tubing I just said the hell with it and bought the BMW piece for about $40 or less - why, cause I was lazy and I'm a bit of a tool whore :-) You can call the best parts guy in the business @ Crevier BMW - 714.835.3171 x2275 - Talk to Vaheh Bashikian (aka Jet) or email him at vbashikian@crevierbmw.com and tell him I sent ya!
Seriously, the dimensions on the tool are 4mm id and 4.25mm od - if you can find a metal tube with dimensions that are close to this you should be able to use it. Someone at a forum posted that a 3/16" tube worked after the outside was sanded down a bit. Like I said, I bought the tool...
Click on the images for larger views. |
Step 1: Getting the required items together
This install requires:
- BMW iPod Interface Kit p/n 65 11 0 392 133
- Apple iPod or iPod mini
- Flat screwdriver
- Phillips screwdriver
- 10mm socket or wrench
- Electric Drill
- 5/8" drill bit
- Utility Knife
- A BMW M3 (E46) without Navigation 9/01 or later production.
- 45 minutes to an hour of free time.
|
 |
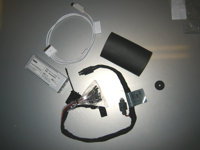
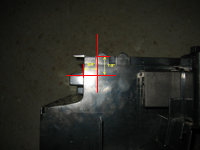
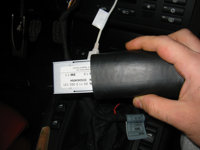
iPod Interface Kit |
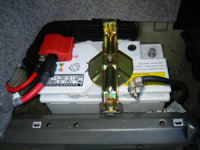
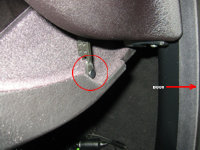
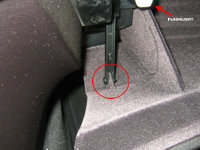
Step 2: Disconnecting the Battery
- Battery is behind the passenger side wheel in the trunk below a plastic cover
- Pull up the trunk floor carpet and backing
- Pop out the rear light pod (see image)
- Pull up the trunk liner above the plastic battery cover
- Turn the two plastic "bolts" 1/4 turn to release the cover
- Pull out the plastic cover
- Using a 10mm socket or wrench loosen the NEGATIVE terminal
- Pull the negative terminal off the post and push it aside so that it does not contact the negative post by accident
|
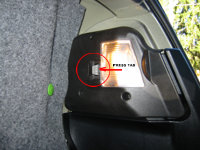
Pop Out Light Pod
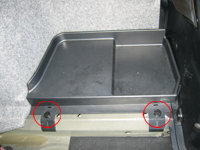
Release Battery Cover
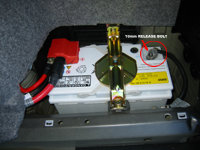
Release Negative Terminal
Negative Terminal Off |
Step 3: Removing Interior Trim
- Two trim pieces need to come out in order to access the radio, etc.
- Have to be REALLY careful with the trim: Patience and even pressure will pull the stuff off, yanking on it will earn a bill for new pieces.
- Starting at the edge of the trim on the passenger side and using a screw driver wrapped in a cloth, etc. pry the edge of the trim up.
- This trim piece is attached with 4 pins and interlocks with the trim piece above the radio.
- Once the first piece is out the piece above the radio has to come out.
- Trim piece above the radio is attached with 2 pins and the side nearest to the steering column is a bit of a pain to get out. Slow and easy if you force it you'll be buying a new piece.
|
Starting The Trim Off
Trim Lifted Up
First Trim Piece Off, Corner Of Second Exposed
Trim Off And Radio Exposed |
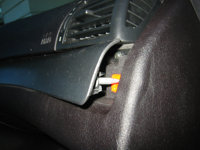
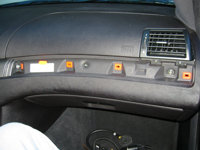
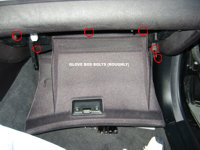
Step 4: Removing The Glove Box
- Empty out the glove box
- First the plastic pins that hold the strap (right) and damper (left) to the glove box tray have to pop out.
- Pressing on the inside end of the plastic pins will start them out - they can be pulled out from there or if stubborn a screw driver will most certainly pop them out.
- There are 6 screws holding the glove box in as well as a series of tabs at the back.
- 3 Screws along the top edge, 2 on the right side and 1 on the left side.
- Once the screws are out the glove box can be leveraged out by pulling it forward toward the seat.
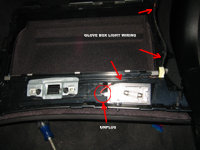
- There are 2 power connections still connected to the glove box so just pull it out enough to release and then set it on the floor.
- Disconnect the power to the glove box light - just simply pulls out.
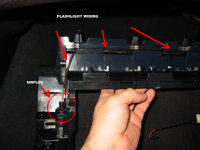
- Disconnect the power to the flash light charging unit - squeeze the 2 tabs on the plug to pop it off.
- Note how the wiring is threaded around the plastic tabs and make a mental picture so that you remember how it goes back in.
- Set the glove box aside for now.
|
Right Side Pin
Left Side Pin
Pins
Bolt Locations
Glove Box Light
Glove Box Flashlight |
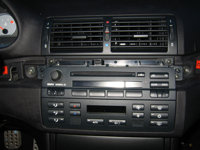
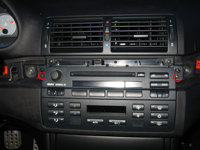
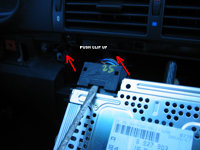
Step 5: Removing The Radio
- Note: BMW claims that you have to remove not only the radio but the HVAC unit below it, the radio/HVAC bracket and the center vent in order to install the interface - I see no reason to do this...
- The HVAC unit requires a special tool (or a set of thin steak knives) to pop out and the vent is a royal pain to remove.
- Either way you can do all of this (though with an increased risk of skinned knuckles) by just removing the radio itself.
- To release the radio the two retaining screws have to come out.
|
Radio Screws |
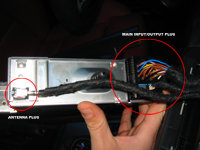
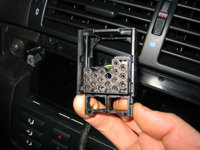
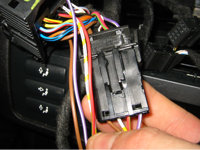
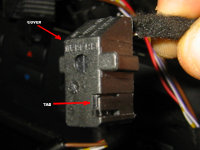
Step 6: Unplugging The Radio
- There are 2 plugs on the back of the radio
- On the right there is a small plug (antenna) which pops off with a squeeze of the tab on the connector
- On the left there is the mother of all radio connectors with is a bit more tricky to pull off
- There is a clip of sorts that holds the large plug in place.
- The clip slides up to release the plug. A Small screw driver easily pops the clip upward to release the plug.
- Once the clip is up the plug will come off but may take a bit of effort since its rather tightly attached.
- Once both plugs are disconnected set the radio head unit aside
|
Radio From The Back
Popping The Clip
Plug Removed |
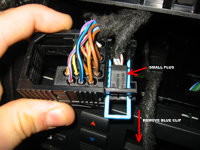
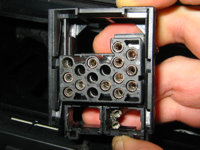
Step 7: Taking The Plug Apart Part I (the easy part)
- The large plug is actually 2 plugs in one
- Toward the bottom of the large plug there is a small plug secured buy a blue clip
- The clip just slides out to the side (may have to start it with a small screw driver or a knife)
- Once the blue clip is out the small plug will pop right out
|
Blue Retaining Clip
Small Plug Removed |
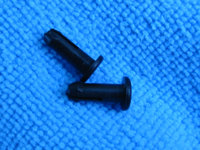
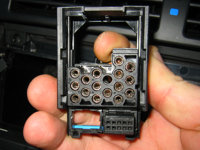
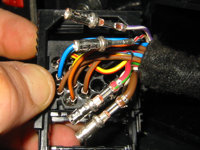
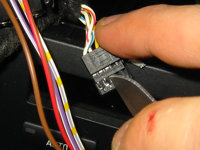
Step 8: Taking The Plug Apart Part 2 (the hard part)
- 4 of the pins have to be removed from the large plug
- The pins are a royal pain in the ass to remove without the "proper" tool though I'm fairly sure one can be fabbed up from tubing (see my note on the subject in the header of this DIY)
- To remove the pins the slide clip has to be pushed all the way up (it will click into position once all the way at the top).
- The pins are numbered on the plug: The following have to come out #5 (violet/white), #7 (white/red), #9 (red/green) & #15 (brown)
|
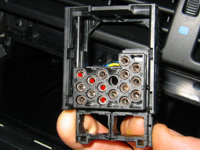
Pins To Be Removed
Super Secret Pin Tool
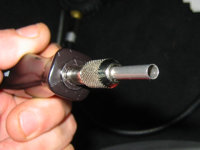
Close Up of Pin Tool
Know Thy Enemy
Pins Removed |
Step 9: Plugging in New Wires Into Large Radio Plug
- The iPod interface harness comes with 4 wires with round pins on the end just like those that just came out and with matching colors.
- The pins from the iPod interface need to go into the large radio plug.
- Violet/White #5, White/Gary #7, Red/Green #9, Brown #15
- The pins simply slide in and lock into place - make sure they are completely seated.
|
|
Step 10: Installing The New Plug
- The 4 pins removed from the large plug have to be inserted into the new 4 pin plug that comes with the interface kit
- The pins just slide in and lock into place - make sure they are seated all the way.
- The plug has a rounded and a squared end - starting from the rounded end the order is Brown, White/Red, Red/Green, Violet/White - an easy way to see if they are going in the correct way is to just match it up to the plug on the iPod interface wire - they have to correspond.
- Once the pins are in the plug, plug it into the iPod interface harness
|
Pins In New Plug
New Plug Plugged Into iPod Harness |
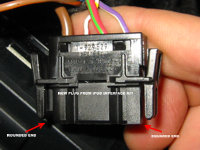
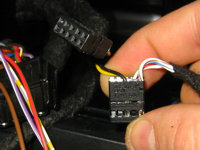
Step 11: Dealing With The Small Plug
- This only applies to cars with a phone or with "phone prep" - I assume this also includes all cars with BMWAssist (which was my scenario)
- 2 of the pins in the small plug that was removed from the large plug you took apart need to come out.
- The small plug has a cover - to pop it off pull up the little black tab and slide the plug out of the cover
- The #3 (yellow) and #8 (black) are the pins to be removed
- These are FAR easier than the round pins. A small knife or watch screw driver can be used to depress the little metal tab and then the pin will pull right out.
|
Removing The Cover
Removing The Pins |
Step 12: Transferring the pins to iPod Interface
- This step is subject to the same phone/phone prep stipulation as Step 10 - if you did not need to do 10 you do not need to do this one
- The yellow and black wires pulled out of the old plug in the last step need to be plugged into the identical plug on the iPod interface harness
- The pins need to go into the same locations (#3 for yellow and #8 for black) as they were on the old plug
- The pins will just slide in and pop into place - make sure they are seated
- Once the pins are in slide the covers back on the new and old plugs
|
Pins In iPod Interface Plug
Covers back On |
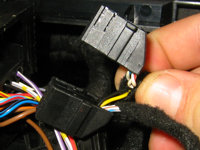
Step 13: Putting the Small Plug Back Into the Large One
- The small plug (the one where the yellow and black wires were added) from the iPod interface need to go back into the location on the larger radio plug where the old small plug was before.
- Looking from the front of the large plug the small plug has to go into the space on the right.
- Plug simply slides into place and is then secured by sliding the blue retaining clip removed in step 7 back into place
|
|
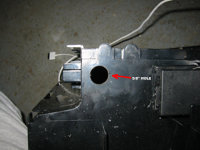
Step 14: On to the Glove Box
- You have to drill a hole in the upper rear left corner of the glove box in order to thread the iPod connector in.
- The "ideal" location is 5/8" from the back and 7/8" from the top edge.
- The hole needs to be 5/8" but most drill bit kits will only include bits to 1/2" - I drilled a 1/2" hole and then used my Dremmel with a sanding bit to open the hole up just enough to accommodate the plug.
|
Hole Location
Hole Drilled |
Step 15: Installing the Grommet
- Cut the grommet on one side - from the center hole to the edge (do not cut the whole grommet in half!)
- Run the iPod connector wire through hole in the glove box with the iPod connector end (rectangular end) in the glove box
- Slide the sliced grommet on to the iPod connector wire and push it into place in the hole in the glove box
|
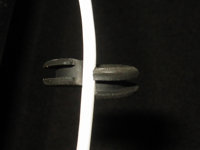
Split Grommet
Grommet In Place |
Step 16: Threading the Wire
- Place the glove box on the passenger side floor and pull as much of the connector wire out as you can out of the glove box
- Run the iPod connector wire up through the back of the dash and into the radio area
|
|
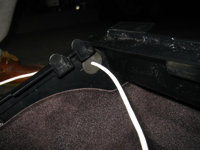
Step 17: Connecting the Interface Box
- Slide the rubber/foam sleave on to the interface box
- Run the interface plug (black harness that you connected to the large radio plug) under the plastic radio bracket so that it goes under and behind the center section (horizontal part with the hole in it - see image) and comes out in the rear right side.
- Plug the interface plug (black) in to the socket labeled "Radio" on the interface box and the white plug from the iPod connector into the socket labeled "iPod" on the interface box.
|
Slipping On The Interface Sleeve
Threading The Plug
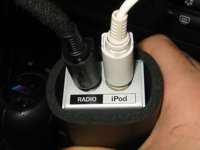
Both Plugs In The Interface |
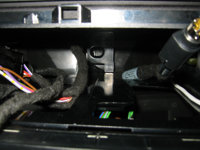
Step 18: "Mounting" the Interface Box
- There is an adequate amount of room at the rear right side of the radio space to "mount" the interface
- The interface has to slide plugs first into the space and takes a bit of wiggling around to get it in place (careful wiggling as to not damage the plugs)
- The side most forward on the interface has to be at most flush with the center post for the radio to mount correctly (horizontal section with the hole in the center).
- Once in there it will stay put - I have not had any noise issues, etc.
|
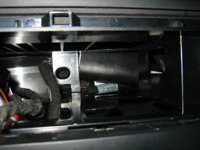
Interface Tucked Away |
Step 19: Reconnecting the Radio
- The large and small plugs have to go back on the radio
- The small antenna plug simply slips back on
- The large radio harness plug needs to be seated and then the top sliding clip needs to be pushed down in order to lock the plug completely in place
|
|
Step 20: Reinstalling the Radio
- This can be a bit tricky since there are a few more wires connected to the left side of the radio
- It took me a few minutes of fussing around and trying different scenarios of pushing wires this or that way until the radio slid all the way back in
- Patience, patience, patience
- Once the radio is back in place replace the screws and snug things down
|
|
Step 21: Reinstalling the Glove Box
- First plug in the glove box light and flash light charging receptacle
- Make sure to thread the wires around the glove box the same way as they were originally (see step 4)
- Pull the iPod connector wire back into the glove box as much as you can
- The glove box has a series of tabs at the back and 2 "hooks" at the front corners
- Start putting the glove box in from the end and swing it up and forward into place.
- Start by installing the front 3 screws back into place
- Finish by replacing the other 3 screws
- Once all the screws are back in reconnect the strap on the right and the "damper" on the left - the pins simply push back in
|
|
Step 22: Reinstalling the Trim
- Start with the piece over the radio
- Do not push the pin on right side of the radio trim piece all the way since the other trim piece has to go over it as well
- Replace the second piece of trim and press down firmly in order to seat all of the pins and make the trim sit flush with the rest of the dashboard
|
|
Step 23: Reconnect the Battery
- Reverse the steps taken in Step #2 to reconnect the battery and button up everything in the trunk
|
|
Step 24: Plug in the iPod
- If everything was done correctly once the iPod is plugged in you will see BMW on the iPod screen
- Test to make sure the iPod is being controlled by the radio, etc - bandage skinned knuckles, enjoy!
- Oh, and reset your clock
|
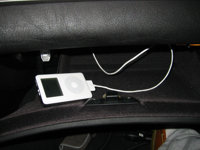
iPod Plugged In And Happy! |

|