|
 |
This install takes 10 - 20 minutes.
Click on the images for larger views. |
Step 1: Getting the required items together
This install requires:
- Turn Signal Bulb(s)
- Long Philips Screwdriver
- A BMW M3 (E46).
- 10 - 20 minutes of free time.
|
 |
|
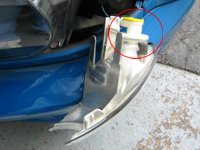
Step 2: Releasing the light assembly
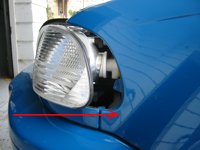
- Open the hood.
- Note the access hole at front edge of the fender (see image).
|
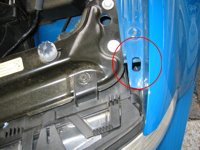
Access Hole Location |
Step 3: Releasing the light assembly
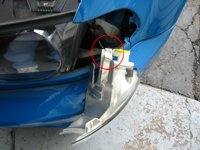
For 2001 and early 2002 cars:
- This is a little tricky - there is a spring loaded clip which you need to depress with the screwdriver.
- Insert the screwdriver through the access hole, tilting it slightly toward the front of the car (see image).
- You may have to poke around but once you hit the clip you will be able to feel it spring up and down.
- Once on the clip, press it down with the screwdriver and tilt the handle of the screwdriver toward the back of the vehicle in the same motion - if done correctly, you will see the lens move forward.
- Pull the lens the rest of the way out with your hands.
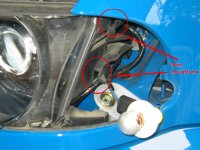
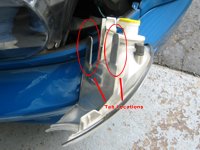
For late 2002 and on cars:
- BMW made an inline change to the way the front turn signal housing is secured.
- In place of the clip outlined above, the housing is secured with a phillips head screw accessible via the same opening.
- The screw pushes down a plastic "basket" to keep the turn signal housing in place.
- You do not have to remove the screw completely, rather just turn it enough to free the housing.
|

Getting at the Clip (01-02)
Clip Location on Removed Lens Assembly (01-02)
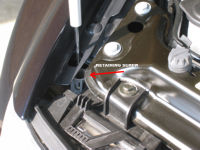
Retaining Screw Location (02-03)
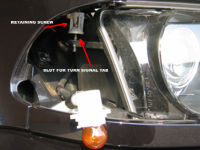
Retaining Screw from Side (02-03) |
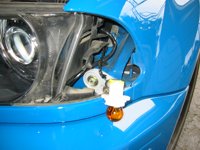
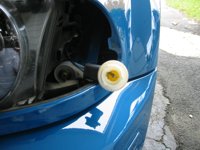
Step 4: Removing the socket
- Locate the socket at the rear of the lens assembly (see image).
- Rotate counter clockwise to release it from the lens.
- Pull the socket out of the lens assembly.
- Set lens assembly aside
|
Location of Socket
Socket and Bulb |
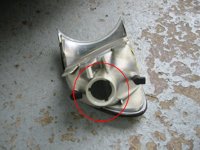
Step 5: Removing the bulb
- Press down gently on the bulb.
- While depressed, rotate the bulb counter clockwise to release it from the socket.
|
Empty Socket |
Step 6: Replacing the bulb
- The bulb has three tabs along its base.
- The bulb will only fit into the socket one way (no chance of a screw up!)
- Rotate the bulb to align it with the recesses in the socket and gently push it in.
- You will feel the bulb hit bottom and depress the bottom of the socket - at this point rotate it about a quarter turn clockwise, until it stops.
- Make sure the bulb is in place by giving it a gentle tug upwards.
|
|
Step 7: Replacing the socket into the lens assembly
- Line up the tabs on the socket with the tabs on the opening in the lens assembly (see image)
- Rotate the socket clockwise to lock it in place
|
Empty Socket |
Step 8: Reinstalling the lens assembly
For 2001 and early 2002 cars:
- Note the location of two tabs on the lens assembly and two corresponding slots on the side of the headlight assembly (see images).
- Line up the tabs in the slots and slide the assembly back (see image)
- Slide the assembly in until it is flush with the vehicle (you will feel it snap into place).
- You're done!
For late 2002 and on cars:
- There is a clamping mechanism on the assembly which this screw tightens, which keeps the assembly in place.
- You have to line up the two pieces of the "clamp" so that they both slide underneath the "basket" when you replace the assembly.
|
Location of Slots
Location of Tabs
Sliding Things Back Into Place |

|